
.png)
.png)
DIY Chippy Paint Door
- Lauren Hare

- Feb 16, 2020
- 3 min read

I was extremely shocked with myself creating a piece like this for my house. I usually keep my every-day decor and style rather simple, so this is a "bold" piece for me. It is quite easy and quick to do since the paint dries quick and nothing needs to be perfect! I used purple and blue since these colors match my house, but customize the colors to fit your style.
I used Debi's Design Diary DIY Chalk-Clay-Mineral Paint. Since this paint has clay in it, it dries quick and is easy to do the "chippy" finish because it will thicken when mixed. This whole process is a layering technique, and I did all the painting with a paint scraper.

Tools needed:
1. Drill with bit to remove door
2. Paint Brush
3. Paint Scraper
4. Plate for paint
5. Paint (Purple is French Millinery, Blue is Farm Fresh, and White is Bead Board)
6. Sander with 220 grit paper
7. Finishing coat (poly, wax, etc.)
First, I removed the door and cleaned an area outside to paint. I did not do any prior sanding, cleaning or preparing to my door. Chalk paint is meant to be painted on any type of surface, so I saved myself a step.
To prepare your paint, pour a bit out on the plate and use your paint scraper to mix it around. As it starts to dry and mix, it will thicken up since the paint contains clay. Thickening your paint will make it easier to texture your finish.
When beginning to paint, use your paint scraper to put your first color on, by swiping it on to cover the door. Leaving some globs of paint is necessary. You will begin scraping the paint globs and spreading them out again. By doing this you will create your textures. You can see in the picture below where I have thin paint spread out to cover the door, and globs of paint beginning to dry that I use to scrape up and spread out again for my chippy texture.

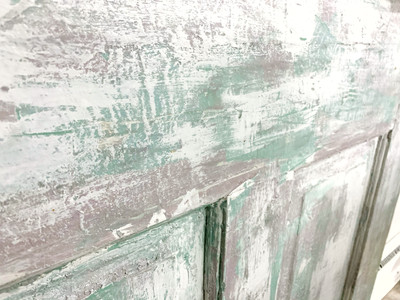
After the first color layer is finished, use the same technique for the second color. If your paint globs begin to dry too quick, you can use a spray bottle to re-activate the paint. When applying the second color, do not be afraid to pick up bottom color globs and spread those colors together to create a mixed look. You can see in this bottom picture there is tons of chippy texture.

This door will in no way be perfect, so there is no "perfect" technique. Just continue to paint and scrape until you get your desired look no matter how minimal or dense. After I completed my chipping technique, this door was a bit too bold for me, so I used a dry brush to lightly brush the Bead Board white color to tone down the color. If you appreciate the colorful look, skip that step!

After all coats were on, I took my sander with a 220 grit paper to lightly sand the top of the door. You can see I did not tape off my window since this paint can be reactivated with water. I just used a wet rag to wipe off the paint and sanding dust. I used a coat of poly to finish the door. Many people use wax when working with chalk paint, and others use no finishing coat. It is your preference and depends on where the piece is located!
I love how my door turned out, and would love to use this finish for a side table or entry way table as well!


You can find a video from Debi's Design Diary, the same video I used to create this door, below.
Until next week,
Casa Azul Owner
Lauren


Comments